Wednesday, November 20, 2024
How to Make a Shoe Rack with a Vintage or Industrial Look

Turn Old Into Awesome: Building a Vintage or Industrial Shoe Rack
Let's be honest, shoes are a bit like socks â€" they have a way of multiplying in the most mysterious ways. A shoe rack isn't just about keeping your kicks organized; it’s an opportunity to showcase your style and make a statement in your entryway or bedroom. And what better way to do that than with a vintage or industrial-inspired shoe rack? Not only will it add a touch of character to your space, but it's also a DIY project that's both fun and surprisingly easy.
Don’t worry, we’re not talking about a time-consuming, complicated project here. We’re going for that effortless, “I found this amazing vintage piece at a flea market†look. And believe me, it's achievable even if your DIY skills are more “beginner†than “expert.†We’ll be exploring a few easy-to-replicate ideas and techniques to create a shoe rack that's both functional and eye-catching.
Vintage Charm: Embrace the Past with a Shoe Rack that Tells a Story
If you’re drawn to the rustic charm of vintage finds, we’ve got a few ideas that'll make your shoe rack the envy of your neighborhood.
Recycled Pallet Power
Pallet wood is like the superstar of the DIY world â€" it’s readily available, affordable, and has that natural rustic look that screams vintage. Here’s how to transform a pallet into a charming shoe rack:
- Choose Your Pallet: Pick a pallet that’s in decent condition. You can find them at your local hardware store, lumberyard, or even ask businesses if they have any they're getting rid of.
- Prep and Clean: Give your pallet a good scrub to remove any dirt or debris. If you want a lighter look, you can sand it down to reveal the wood's natural grain.
- Design Your Rack: This is where your creativity shines! You can use the pallet as is, or get creative by cutting it into smaller sections. Add some extra shelves or even create a tiered design. For a more polished look, consider using brackets or legs to hold the pallet sections together.
- Add Finishing Touches: A coat of stain, paint, or a sealant will help protect your pallet and enhance its natural beauty. You can even go for a distressed look by using sandpaper to create an aged effect.
Upcycle a Vintage Ladder
Got an old ladder kicking around in the garage? Give it a second life as a chic and functional shoe rack! Here’s how to turn a ladder into a stylish storage solution:
- Find Your Ladder: Hunt for a sturdy, vintage ladder in antique shops, flea markets, or online. You can also get creative with a modern ladder if you’re going for a more industrial look.
- Give It a Makeover: Sand down the ladder and give it a fresh coat of paint to match your decor. You can go for a neutral color or a bold hue to make a statement.
- Secure Your Shoes: For an extra layer of organization, consider attaching hooks or wire baskets to the ladder rungs. This will help to keep your shoes secure and off the floor.
Industrial Edge: Embrace the Urban Aesthetic
Industrial design is all about raw materials, exposed elements, and a touch of ruggedness. Here’s how to bring an industrial vibe to your shoe rack:
Pipe It Up
Industrial pipes have that cool, utilitarian feel that makes them perfect for a DIY project. Here’s how to create a sleek and functional pipe shoe rack:
- Gather Your Supplies: You’ll need black iron pipe fittings, threaded pipe, and a sturdy base (like a piece of wood or metal). Get the fittings and pipes at a hardware store or online.
- Plan Your Design: Sketch out your shoe rack design before you start building. This will help you determine how many pipes and fittings you’ll need.
- Assemble the Rack: Use pipe wrenches to assemble the pipes and fittings according to your design. Remember to tighten everything securely.
- Attach the Base: Secure the base to the assembled pipe frame. You can use brackets or bolts to ensure it’s stable and secure.
- Add a Finishing Touch: You can leave the pipes in their raw metal state, or you can apply a clear sealant or even a coat of paint for added durability and to match your décor.
Metal Mesh Magic
Metal mesh is another excellent material that embodies the industrial look. It’s strong, durable, and offers a cool, open design:
- Find Your Mesh: Look for metal mesh panels at a hardware store, craft store, or online. You can choose from various styles, from a simple wire mesh to a more intricate, textured pattern.
- Create a Frame: Use wood or metal to create a rectangular frame that will hold your mesh panels. This will serve as the base for your shoe rack.
- Attach the Mesh: Attach the mesh panels to the frame using wire or zip ties. Make sure they’re secure and evenly spaced.
- Add Optional Features: You can add shelves, hooks, or compartments to your mesh frame to create a multi-functional shoe rack.
Tips for Success: Making Your Shoe Rack a Winner
Here are a few tips to help your shoe rack project go smoothly:
- Measure Twice, Cut Once: This is a classic DIY mantra! Take careful measurements and make sure your cuts are precise. This will ensure that your shoe rack fits together properly.
- Don’t Be Afraid to Experiment: DIY is all about creativity. Feel free to mix and match materials, colors, and designs to create a shoe rack that reflects your unique style.
- Consider Your Space: Think about the size and shape of your entryway or bedroom before you start building. Choose a shoe rack that fits your available space and your storage needs.
- Add a Personal Touch: Personalize your shoe rack by incorporating elements that make it your own. This could be a unique paint color, salvaged hardware, or even a personal touch like a vintage sign or a decorative plant.
Commonly Asked Questions
Still have some questions about creating your own vintage or industrial shoe rack? Here are some answers to common queries:
What kind of paint should I use for a vintage shoe rack?
Choose a paint that will match your desired look. For a rustic, vintage look, consider using chalk paint, which gives a slightly distressed finish. For a more modern vintage style, use a paint with a satin or semi-gloss finish.
How can I give my shoe rack a distressed look?
There are several ways to achieve that cool, aged look. One simple method is to sand down the painted surface using sandpaper with varying grits. You can also create a distressed look by applying paint with a sponge or using a dry brush technique.
What are some good ways to protect my shoe rack?
Seal your shoe rack to protect it from wear and tear. You can use a clear sealant to protect the wood or metal, or apply a coat of wax for added durability. If you’re using a pallet, consider applying a sealant that’s specifically designed for outdoor wood.
DIY Blanket Ladders That Are Perfect for Gifts

DIY Blanket Ladders That Are Perfect for Gifts
Do you know someone who loves cozy nights in? Or perhaps someone who’s always looking for creative ways to organize their home? If so, a DIY blanket ladder might just be the perfect gift! Not only are these ladders incredibly useful for storing blankets and throws, but they also add a touch of rustic charm to any room. And the best part? They’re surprisingly easy to make!
With a little bit of time and effort, you can craft a personalized blanket ladder that’s sure to be appreciated. This guide will walk you through the process, step by step, so you can create a beautiful and functional gift.
Choosing Your Materials
The first step is to gather your materials. You’ll need:
- Wood for the ladder rungs and side rails (consider pine, cedar, or oak)
- Wood stain or paint (optional, for a personalized touch)
- Wood glue
- Screws
- Sandpaper (various grits)
- Measuring tape
- Level
- Saw (either a circular saw, hand saw, or jigsaw)
- Drill with a screwdriver bit
- Clamps (optional, for holding pieces together while gluing)
Choosing the Right Wood
The type of wood you choose will depend on your personal preference and the overall aesthetic you’re going for. Pine is a budget-friendly option that is easy to work with. Cedar offers a natural resistance to insects and moisture, making it a good choice for outdoor use. Oak is a durable and elegant option that can be stained to enhance its natural beauty.
Crafting the Ladder
Once you have your materials, you can start building the ladder! Follow these instructions:
- Measure and cut the side rails. Determine the desired height and width of your ladder. Cut two pieces of wood to the length of the desired height for the side rails.
- Measure and cut the rungs. Measure the desired width of your ladder, and cut the rungs to this width. Cut enough rungs to create the desired number of steps.
- Sand the wood. Smooth all the edges of the side rails and rungs with sandpaper. Start with a coarser grit and gradually move to a finer grit for a smooth finish.
- Stain or paint the wood (optional). If desired, apply a wood stain or paint to the ladder. Allow it to dry completely before moving on to the next step.
- Assemble the ladder. Position the rungs on the side rails and attach them using wood glue and screws. Make sure the rungs are evenly spaced. You can use clamps to hold the pieces together while the glue dries.
- Finish the ladder. Once the glue has dried, you can add a protective layer of sealant or varnish to the ladder (optional).
Finishing Touches
Now that your blanket ladder is built, you can personalize it further with finishing touches. Some ideas include:
- Attaching a decorative shelf. Create a small shelf at the top of the ladder to display decorative items or books.
- Adding a hook for a robe or a small bag. A sturdy hook adds functionality and a touch of rustic charm.
- Decorating the ladder with fabric scraps or twine. This can add visual interest and tie the ladder into your existing decor.
Gifting with Love
Your DIY blanket ladder is now ready to be gifted! Wrap it in a beautiful bow and include a personalized note expressing your thoughtfulness. This unique gift is sure to be cherished by its recipient for years to come.
Stylish Wooden Bird Feeders That Will Enhance Any Garden or Yard
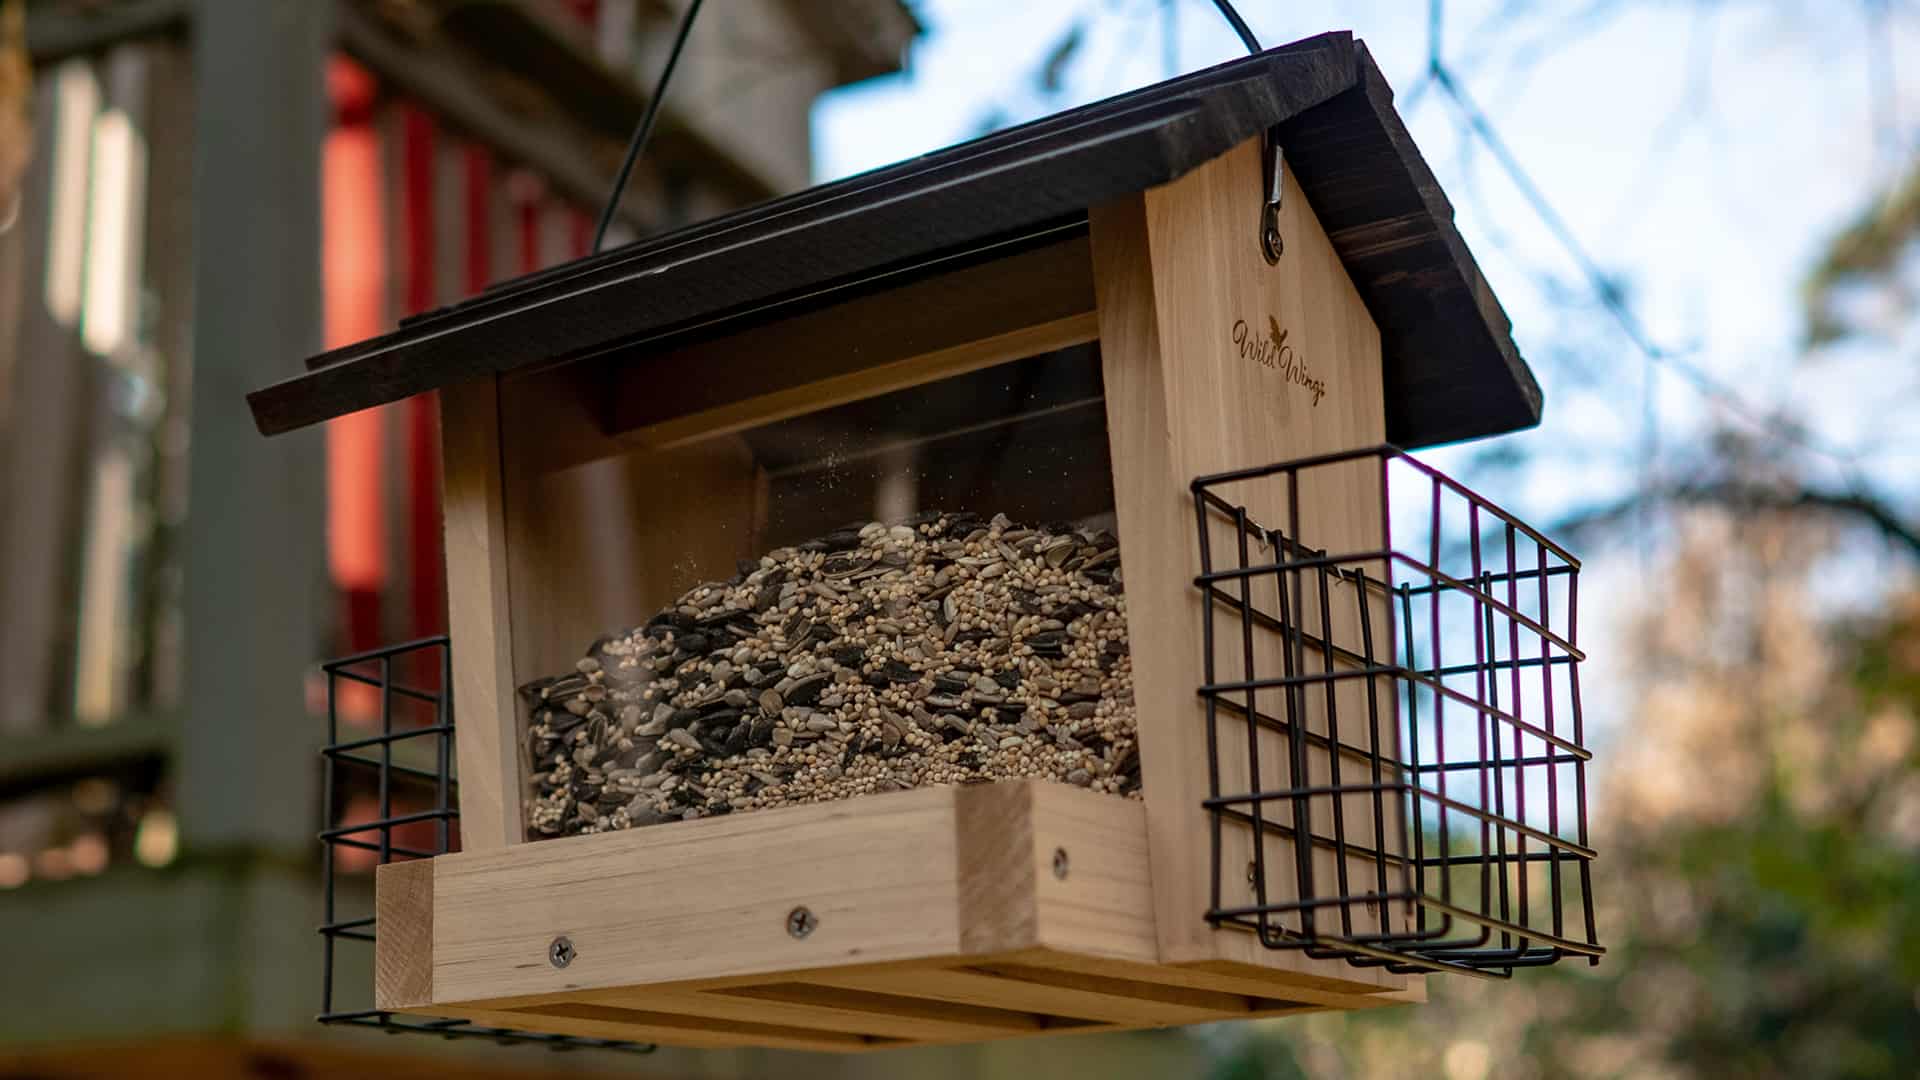
Stylish Wooden Bird Feeders That Will Enhance Any Garden or Yard
Birds are a welcome sight in any garden, bringing with them vibrant colors, delightful songs, and a sense of tranquility. But beyond the aesthetic, bird feeders serve a crucial purpose in providing food and shelter for our feathered friends, especially during harsh weather conditions. If you're looking to attract more birds to your outdoor space, a stylish wooden bird feeder is a great option that will enhance your garden's beauty while offering a helping hand to our winged companions.
Wooden bird feeders offer a distinct charm compared to their plastic counterparts. Their natural warmth and versatility allow them to seamlessly blend into any garden setting, from classic to modern. They can be painted or stained to complement the colors of your existing landscaping, or left in their natural wood tones for a rustic appeal. Plus, wooden feeders are often hand-crafted with intricate designs, making them unique pieces of art that will be admired by you and your guests.
The choice of wood is important when it comes to bird feeders. Hardwoods like cedar and redwood are known for their durability and resistance to rot and decay, making them ideal for outdoor use. These woods also contain natural oils that repel insects and prevent moisture damage, ensuring your feeder remains in good condition for years to come. Softwoods like pine and fir are more susceptible to decay but can be treated with preservatives for extended lifespan.
Types of Wooden Bird Feeders
There are numerous types of wooden bird feeders available, each designed to attract specific bird species and accommodate different feeding styles. Let's explore some popular options:
Platform Feeders
Platform feeders are the simplest and most versatile type, providing a large, flat surface for birds to perch and eat. They're perfect for larger birds like cardinals, doves, and jays, as well as ground-feeding birds like sparrows and juncos. You can choose from a variety of platform shapes and sizes, depending on the birds you want to attract. Platform feeders are also great for offering suet cakes, mealworms, or fruits, giving your feathered friends a variety of options.
Hopper Feeders
Hopper feeders are enclosed containers with a feeding platform or tray underneath. They provide protection from rain and snow, keeping the food dry and fresh. Hopper feeders are excellent for attracting finches, sparrows, and chickadees. They come in various sizes and designs, from simple rectangular shapes to intricate farmhouse styles.
Tube Feeders
Tube feeders are elongated containers with multiple feeding ports, ideal for attracting smaller birds like hummingbirds, chickadees, and goldfinches. These feeders often come with a variety of perches and feeders, allowing birds to feed from different angles. Some tube feeders have squirrel-resistant designs, like mesh cages or baffles, to prevent pesky squirrels from stealing the food.
Suet Feeders
Suet feeders are designed to hold high-energy suet cakes, a favorite food of woodpeckers, chickadees, and nuthatches. These feeders are often made of wire mesh or have a durable plastic or metal container to hold the suet. They can be mounted on trees, fences, or posts.
Choosing the Right Wooden Bird Feeder
When selecting a wooden bird feeder, consider the following factors:
Bird Species
Think about the birds you want to attract. If you want to feed smaller birds, a tube feeder or a small hopper feeder is a good choice. For larger birds, a platform feeder or a larger hopper feeder would be more suitable.
Feeding Preferences
Different birds have different feeding preferences. Some birds prefer seeds, while others enjoy suet or fruits. Choose a feeder that is appropriate for the type of food you want to offer.
Size and Capacity
The size and capacity of the feeder will depend on the number of birds you expect to feed. If you have a large flock of birds visiting your garden, you will need a larger feeder with a greater capacity.
Ease of Cleaning
Bird feeders need to be cleaned regularly to prevent the spread of diseases. Choose a feeder that is easy to disassemble and clean.
Durability and Weather Resistance
Look for a feeder that is made of durable materials that can withstand the elements. Hardwoods like cedar and redwood are excellent choices for outdoor use.
Tips for Attracting Birds to Your Wooden Bird Feeder
Once you've chosen the perfect wooden bird feeder, here are some tips to attract birds to your garden:
Stylish Wooden Bird Feeder Ideas
Here are some ideas for stylish wooden bird feeders that will enhance your garden's beauty:
Caring for Your Wooden Bird Feeder
To ensure your wooden bird feeder lasts for years to come, follow these care tips:
Commonly Asked Questions
What type of wood is best for bird feeders?
Hardwoods like cedar and redwood are the best choices for bird feeders due to their durability, rot resistance, and natural insect repelling properties.
How do I keep squirrels away from my feeder?
There are several squirrel-resistant feeder designs available, such as feeders with cages or baffles. You can also try using squirrel-proof bird seed mixes or placing your feeder in a location that is difficult for squirrels to access.
What kind of seed should I use in my feeder?
The type of seed you use will depend on the birds you want to attract. Black oil sunflower seeds are a popular choice as they are enjoyed by a wide variety of birds. You can also offer a mix of seeds, suet, fruits, and nuts to attract a diversity of birds to your garden.
How often should I refill my feeder?
Refill your feeder as needed, but try to keep it full, especially during cold weather or when there is a large flock of birds visiting.
Adding a stylish wooden bird feeder to your garden is a great way to attract birds, enhance your landscaping, and create a welcoming space for nature's beauty. With proper care and maintenance, your wooden bird feeder will be a cherished part of your outdoor sanctuary for years to come. So, go ahead, bring a touch of nature's magic to your garden with a beautiful and functional wooden bird feeder.
Monday, November 18, 2024
How to Make Wooden Chess Tables with a Weathered or Distressed Finish

Crafting Wooden Chess Tables with a Weathered or Distressed Finish: A Comprehensive Guide
A wooden chess table, with its rich history and timeless appeal, is a cherished possession for any chess enthusiast. But, the allure of a weathered or distressed finish elevates the piece from simple furniture to an object of art. This guide will walk you through the process of creating your own wooden chess table, focusing on achieving a vintage, worn-in aesthetic that evokes a sense of time and tradition.
Choosing the Right Wood
The heart of your chess table lies in the wood selection. Certain species lend themselves beautifully to a distressed finish, offering character and visual depth. Here are some top contenders:
Hardwoods for Longevity:
- Oak: Known for its strength, durability, and striking grain patterns, oak ages gracefully, making it an ideal choice for a weathered look.
- Cherry: With a warm, reddish-brown hue, cherry develops a rich patina over time, lending a vintage feel.
- Walnut: The dark, chocolatey color and intricate grain patterns of walnut lend themselves to a rustic, aged aesthetic.
- Maple: Maple's light, creamy color provides an excellent base for distressing techniques, allowing the weathered finish to truly stand out.
Softwoods for Rustic Charm:
- Pine: Pine's soft texture and distinct knots make it an excellent choice for a weathered, rustic look. Its affordability makes it an attractive option for beginners.
- Cedar: Cedar's natural oils and fragrant aroma contribute to its rustic appeal. Its soft texture allows for easy distressing.
Designing Your Chess Table: Dimensions and Features
Once you have chosen your wood, the next step is to decide on the dimensions and features of your chess table. Consider the following:
- Size: A standard chess board measures 19.25 inches square. Factor in the thickness of the board, the legs, and any desired overhang for the playing surface. A comfortable playing height is typically around 28 to 30 inches.
- Shape: The classic rectangular shape is always a safe bet. For a more unique design, consider a round or octagonal table.
- Storage: Incorporate drawers or compartments for storing chess pieces, board games, or other accessories.
Constructing the Table: A Step-by-Step Guide
Building your chess table is a rewarding process. Here's a detailed guide to help you along the way:
1. Cutting and Assembling the Frame:
- Cut the wood according to your design plans, ensuring precise measurements for a sturdy frame. Use a table saw or jigsaw for accurate cuts.
- Join the frame pieces using wood glue and screws for secure bonds. Clamp the pieces firmly during drying to prevent warping.
2. Creating the Tabletop:
- Cut a piece of plywood or solid wood to the desired size for your chessboard surface.
- Attach the tabletop to the frame using screws or dowels.
3. Adding Legs and Support:
- Cut and shape the legs according to your design. Use a router to add decorative details if desired.
- Attach the legs to the frame securely, ensuring a stable base for your table.
- Consider adding additional support pieces such as aprons or rails to reinforce the frame.
4. Finishing Touches: Drawer Installation (Optional):
- If you've designed drawers for your chess table, create the drawer boxes, attach glides, and install them into the frame.
Achieving the Weathered or Distressed Finish: Techniques and Tips
The art of distressing lies in creating an illusion of age and wear. Experiment with these techniques to achieve the desired look:
1. Sanding for Natural Wear:
- Use a variety of sandpaper grits, starting with coarse grit to remove sharp edges and create deeper gouges. Work your way up to finer grits for smoother transitions.
- Target areas that would naturally experience wear, such as corners, edges, and the tabletop surface.
2. Chipping and Knocking for Authentic Damage:
- Use a hammer and chisel to create small chips and dents in the wood. Aim for irregular shapes and placements for a natural look.
- You can also use a screwdriver or a small nail to create indentations.
3. Staining for Depth and Character:
- Use a water-based stain to enhance the grain pattern and create a vintage look. Apply multiple coats with varying techniques for a more distressed effect.
- Use a damp cloth to wipe away excess stain in certain areas, creating lighter patches that add visual interest.
4. Paint for Color and Texture:
- Choose a paint color that complements your wood and desired aesthetic. Use chalk paint or milk paint for a vintage, matte finish.
- Distress the paint by sanding, scraping, or chipping it in strategic areas to expose the underlying wood.
5. Finishing with Wax or Polyurethane:
- Apply a coat of wax or polyurethane to protect the finish and enhance its depth. You can use a brush or a cloth to apply the finish.
- For a more rustic feel, apply a thin coat of wax and buff it to a soft sheen.
Maintenance and Care: Keeping Your Chess Table Beautiful
A distressed chess table, while adding character, requires a bit more attention than a polished one. Follow these tips for optimal care:
- Dusting: Regularly dust your chess table with a soft cloth or a feather duster to prevent the accumulation of dirt and grime.
- Cleaning: For deeper cleaning, use a damp cloth and a mild wood cleaner. Avoid harsh chemicals that could damage the finish.
- Protection: Use coasters to protect the surface from watermarks and scratches caused by hot or cold objects.
- Waxing: Apply a thin coat of wax to the surface every few months to enhance the finish and protect it from wear and tear.
Conclusion: Your Distressed Chess Table, a Work of Art
Crafting a wooden chess table with a weathered or distressed finish is a labor of love, resulting in a truly unique and personalized piece. The process allows you to express your creativity while creating a timeless heirloom for generations to come.
Embrace the imperfections, appreciate the history that each distress mark tells, and let your chess table become a conversation starter, a testament to the enduring power of craftsmanship and the beauty of time-worn elegance.
Friday, November 15, 2024
How to Build DIY Floating Shelves for Your Living Room

Elevate Your Living Room with DIY Floating Shelves
Tired of bulky bookshelves taking up precious floor space in your living room? Embrace the sleek and modern aesthetic of floating shelves, a DIY project that's easier than you think. This guide will walk you through the process, from choosing the right materials to installing your new floating shelves with confidence.
Gather Your Materials
Before you dive into construction, make sure you have all the necessary materials. Head to your local hardware store and pick up:
- Shelf boards: Choose your desired material, whether it's wood, MDF, or even reclaimed wood for a rustic touch. Consider the thickness based on the weight you'll be putting on the shelves.
- Brackets: These are the hidden supports for your shelves. You can find various styles like L-brackets, invisible brackets, or decorative brackets.
- Screws: Make sure to use screws appropriate for your shelf material and bracket type.
- Level: A level is essential for ensuring your shelves are perfectly straight.
- Measuring tape: You'll need this to precisely measure your shelf placement.
- Pencil: Mark the wall where the brackets will go.
- Drill: A drill makes installation a breeze.
- Stud finder: Locate the wall studs for strong support.
- Safety glasses and gloves: Protect yourself during drilling.
Planning and Preparation
Now it's time to plan your floating shelf design. Consider these factors:
Shelf Dimensions
Measure the space where you want to install the shelves. Determine the optimal length and width to suit your display needs. You can choose to have multiple shelves of different sizes, or create a single, long floating shelf for a dramatic statement.
Shelf Placement
Think about the purpose of your shelves. Will you be showcasing books, decorative items, plants, or a combination of all? Plan the height of each shelf accordingly. A good rule of thumb is to have shelves spaced about 12 inches apart to accommodate most items. Visualize the layout and mark the desired positions on the wall.
Bracket Selection
Consider the weight of the items you'll be placing on the shelves. Choose sturdy brackets that can support the load. If you're aiming for a minimalist look, invisible brackets are an excellent option. Decorative brackets add a touch of elegance to the design.
Installation Steps
With your materials gathered and the plan in place, it's time to build your floating shelves.
Find the Wall Studs
Use a stud finder to locate the wall studs. This ensures your shelves are securely anchored and won't sag over time. Mark the stud locations with a pencil.
Attach the Brackets
Hold the brackets against the wall at the desired height and mark the screw locations. Drill pilot holes slightly smaller than the screw diameter to prevent the wood from splitting. Attach the brackets to the wall using the screws and your drill.
Install the Shelves
Once the brackets are firmly in place, carefully slide your shelf boards onto the brackets. Adjust the position as needed until they are perfectly level. Use a level to ensure your shelves are straight.
Style and Decor
Congratulations! You've successfully installed your DIY floating shelves. Now, it's time to have fun with the decorating process.
Display your favorite books, artwork, plants, and decorative items to bring personality and style to your living room. Use the shelves to showcase your unique taste and create a space that truly reflects your personality.
Don't be afraid to experiment with different heights, arrangements, and color schemes. Let your creativity flow and enjoy the satisfaction of crafting your own beautiful and functional floating shelves.
How to Make Wooden Snowflakes for Christmas
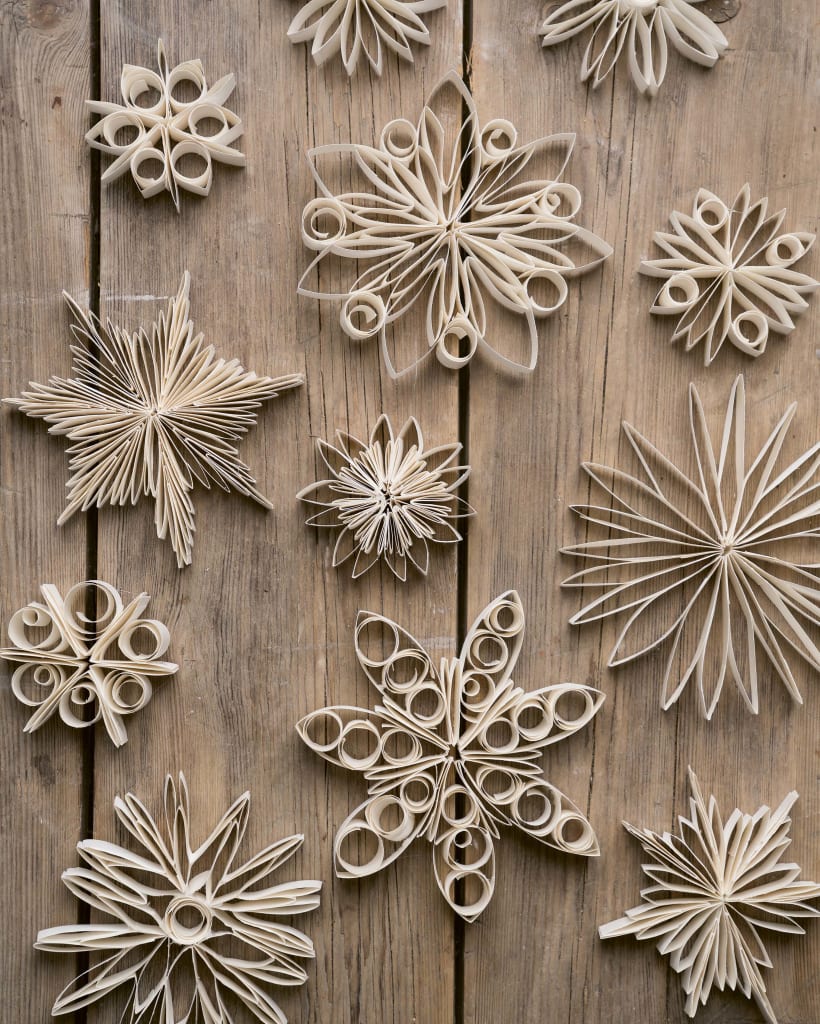
Create Stunning Wooden Snowflakes for a Festive Christmas
Embrace the magic of Christmas with a handcrafted touch by creating your own wooden snowflakes. These delicate ornaments bring a touch of warmth and whimsy to your holiday décor. This guide provides a step-by-step process to craft beautiful wooden snowflakes that will be treasured for years to come.
Gathering Your Supplies
Before diving into the creative process, ensure you have the necessary tools and materials at your disposal. These include:
- Wooden craft sticks (various sizes)
- Craft glue (strong hold)
- Scissors or a craft knife
- Paint (optional, in festive colors)
- Glitter or embellishments (optional)
- String or ribbon for hanging
Crafting the Snowflake
Now, let's unleash your creativity and craft your wooden snowflakes:
Designing Your Snowflake
Start by sketching a snowflake design on paper. This serves as your blueprint, helping you visualize the final outcome. Experiment with different patterns, varying the number of points and the complexity of the design.
Cutting the Sticks
Using scissors or a craft knife, carefully cut the wooden sticks into desired lengths according to your design. For smaller snowflakes, you may need to cut the sticks into shorter segments. Remember to cut with precision to ensure a clean and symmetrical snowflake.
Assembling the Snowflake
Time to assemble the snowflake. Apply a generous amount of craft glue to the ends of the sticks and carefully attach them together following your design. Press firmly to ensure secure bonding. Allow the glue to dry completely before moving to the next step.
Adding Finishing Touches
Once your wooden snowflakes are dry, you can unleash your creativity to personalize them:
Painting and Decorating
If you're feeling artistic, grab your paints and add vibrant hues to your snowflakes. Consider festive colors like red, green, gold, or silver. You can also use glitter, sequins, or other embellishments to enhance their beauty. Let your imagination run wild!
Hanging Your Snowflakes
Finally, attach a string or ribbon to the top of your snowflake for hanging. Choose a suitable length and color that complements your snowflake design. You can now proudly display your handcrafted snowflakes throughout your home.
Embrace the Festive Spirit
With your wooden snowflakes ready, you've infused your Christmas décor with a unique, handcrafted touch. These charming ornaments are sure to spread holiday cheer and create lasting memories. Enjoy the process and the beauty of these festive creations. Happy crafting!
How to Create Beautiful Wood Projects for Beginners

How to Create Beautiful Wood Projects for Beginners
Working with wood is a rewarding and fulfilling craft that allows you to create beautiful and functional pieces for your home, garden, or even as gifts. Whether you're a complete novice or have some basic woodworking experience, this comprehensive guide will equip you with the knowledge and techniques to embark on your woodworking journey.
Choosing the Right Wood
The type of wood you choose will significantly impact the final look, durability, and workability of your project. Here's a guide to popular woods for beginners:
Softwoods
- Pine: Affordable, lightweight, and easy to work with. Ideal for beginner projects like birdhouses, small shelves, and picture frames.
- Cedar: Known for its natural insect-repelling properties and pleasant aroma. Commonly used for outdoor furniture, planters, and garden structures.
- Fir: Similar to pine in terms of workability but slightly stronger. Suitable for furniture, cabinets, and decorative items.
Hardwoods
- Oak: Durable, strong, and aesthetically pleasing. Great for furniture, flooring, and high-end woodworking projects.
- Maple: Known for its beautiful grain patterns and hardness. Commonly used for furniture, cutting boards, and musical instruments.
- Cherry: Offers a rich, reddish-brown color that deepens with age. Popular for furniture, cabinets, and decorative objects.
Essential Woodworking Tools
To get started, you'll need a basic set of woodworking tools. Don't feel overwhelmed by the list; you can gradually acquire tools as you progress in your skills.
Hand Tools
- Measuring Tape: Crucial for accurate dimensions.
- Pencil: For marking wood.
- Hammer: For driving nails and securing components.
- Screwdriver: For assembling parts with screws.
- Chisels: For carving, shaping, and removing wood.
- Hand Saw: For cutting wood in straight lines.
- Sandpaper: For smoothing and refining surfaces.
- Clamps: For holding wood securely during assembly.
Power Tools
- Circular Saw: For cutting wood along straight lines.
- Jigsaw: For cutting curves and intricate shapes.
- Drill: For creating holes and driving screws.
- Belt Sander: For smoothing and shaping large surfaces.
- Random Orbital Sander: For achieving a fine finish.
Safety First: Woodworking Safety Tips
Woodworking can be a rewarding hobby, but it's essential to prioritize safety. Follow these tips to avoid injuries:
- Wear safety glasses: Protect your eyes from flying debris.
- Use ear protection: Power tools can generate loud noise.
- Keep work area clean and clutter-free: Reduce tripping hazards.
- Use proper tools and equipment: Ensure tools are in good condition and sharp.
- Never operate power tools while distracted: Focus on the task at hand.
- Be aware of your surroundings: Be mindful of other people and objects around you.
Beginner Woodworking Projects
Here are some easy and rewarding woodworking projects for beginners:
Birdhouse
A classic beginner project that introduces basic cutting, assembly, and finishing techniques. Choose a simple design and use pine or cedar for durability. Decorate it with paint or stain to add personality.
Small Wooden Box
Learn about miter cuts, joining techniques, and finishing with a simple box project. Use hardwoods like cherry or maple for a more elegant look.
Wooden Coasters
A fun project for experimenting with different wood species and finishes. Use a variety of woods like walnut, maple, or cherry for contrasting colors and grain patterns.
Cutting Board
A practical and functional project that allows you to learn about selecting and working with hardwoods. Use a hard wood like maple or walnut for durability and choose a design that incorporates different cutting surfaces.
Tips for Success
Here are some helpful tips to ensure a smooth and enjoyable woodworking experience:
- Start with simple projects: Build confidence and learn basic skills before tackling complex designs.
- Practice on scrap wood: Experiment with tools and techniques on scrap wood before working on your final project.
- Use precise measurements: Accurately measure and mark your wood to ensure precise fit and assembly.
- Sanding is key: Smooth surfaces with progressively finer sandpaper for a professional finish.
- Don't rush: Take your time and enjoy the process. Quality over speed is key.
Finishing Touches
A proper finish enhances the appearance and protects your woodworking project.
Staining
Stains enhance the natural beauty of wood by adding color and depth. Choose from oil-based or water-based stains for a desired finish.
Painting
Paint provides a smooth, opaque coating that offers protection and a variety of colors and finishes.
Polyurethane
A protective clear coat that enhances the wood's natural beauty and provides a durable finish.
Embrace the Journey
Woodworking is an ongoing learning process. Don't be afraid to experiment, try new techniques, and seek out inspiration from other woodworkers. With practice, patience, and a little creativity, you'll be amazed at what you can create with wood.
How to Build Chess Tables with a Folding or Compact Design for Small Spaces
Building a Compact Chess Table for Your Small Space
You love chess. You love the strategy, the challenge, the satisfaction of a well-played game. But what if you don’t have a lot of space to set up a proper chess table? Don’t worry! With a little ingenuity and some DIY skills, you can build a chess table that’s both functional and space-saving. In this article, we’ll explore how to build a compact chess table that can be folded or designed to fit perfectly in your small space.
Let’s get started!
Choosing the Right Design:
The first step is deciding on the design of your chess table. There are a few key considerations to make:
- Folding Table: This is a popular option for small spaces. A folding chess table can be easily stored away when not in use, and it can be set up in just a few minutes.
- Compact Design: A compact design chess table might not fold, but it is smaller in size and can be easily squeezed into a corner or against a wall.
- Multipurpose Table: You could build a chess table that also serves as a coffee table or a small dining table. This maximizes its utility and makes it even more space-saving.
Choosing Materials:
After deciding on the design, it's time to think about the materials. Here are some suggestions:
- Wood: This is a classic and durable option, and it can be stained or painted to match your décor. Consider using plywood for the tabletop and solid wood for the legs and frame for a sturdy and lasting piece.
- Metal: A metal chess table can be lighter and easier to move around, but it may not be as sturdy as a wood table. Metal is also more resistant to scratches and stains, making it a good option for high-traffic areas.
- Laminate: Laminate is a more affordable option that is easy to clean. It comes in a variety of colors and patterns.
Remember to select materials that are appropriate for the design you’ve chosen. You’ll also want to consider the weight and ease of portability, especially if you plan on moving the table around frequently.
Building a Folding Chess Table:
Building a folding chess table is a bit more involved, but it's a great project for someone with some woodworking experience. Here are the general steps:
Materials and Tools:
- Wood (plywood for the tabletop, solid wood for the frame and legs)
- Hinges
- Screws
- Wood glue
- Saw
- Drill
- Sandpaper
- Clamps
- Measuring tape
- Pencil
- Stain or paint (optional)
Instructions:
- Cut the wood pieces: Use your saw to cut the wood pieces to the size you need for the tabletop, frame, and legs. Remember to account for the thickness of the wood when making your measurements.
- Assemble the frame: Attach the frame pieces together using wood glue and screws. Make sure the frame is square and sturdy.
- Attach the hinges: Attach the hinges to the underside of the tabletop. Make sure the hinges are positioned so that the tabletop folds in half smoothly.
- Attach the legs: Attach the legs to the frame using wood glue and screws. The legs should be positioned so that the table is stable when it is open and closed.
- Sand and finish: Sand the table smooth and apply stain or paint if desired.
There are many detailed tutorials online for building folding chess tables. You can find resources with step-by-step instructions and visual aids.
Building a Compact Chess Table:
Building a compact chess table is simpler than a folding table. It’s a great beginner woodworking project.
Materials and Tools:
- Wood (plywood for the tabletop, solid wood for the legs)
- Screws
- Wood glue
- Saw
- Drill
- Sandpaper
- Clamps
- Measuring tape
- Pencil
- Stain or paint (optional)
Instructions:
- Cut the wood pieces: Cut the wood pieces to the size you need for the tabletop and legs. The tabletop can be square or rectangular depending on your preference.
- Attach the legs: Attach the legs to the underside of the tabletop using wood glue and screws. Make sure the legs are evenly spaced and secure.
- Sand and finish: Sand the table smooth and apply stain or paint if desired.
Again, there are a plethora of resources online that can guide you through the process.
Adding Extra Features:
Once you have your basic chess table built, you can personalize it with some extra features:
- Storage: Add a drawer or shelf underneath the table to store chess pieces, books, or other game accessories.
- Cup Holders: Incorporate built-in cup holders for your favorite drinks while playing.
- LED lights: If you love playing chess at night, add some LED lights to your chess table. This will give you better visibility of the board and create a more inviting atmosphere.
- Magnetic Board: If your table is compact, a magnetic chessboard would be a wonderful feature. It allows you to easily store your pieces and protect your table.
Where to Find Inspiration:
If you need more inspiration or are looking for detailed plans, you can check out these resources:
- Pinterest: Pinterest is a great place to find DIY projects, including chess tables.
- YouTube: YouTube is full of video tutorials on how to build chess tables.
- Online Woodworking Forums: Join woodworking forums to connect with other woodworkers and ask for advice.
Commonly Asked Questions:
Here are some frequently asked questions about building a compact chess table:
How much does it cost to build a chess table?
The cost of building a chess table will depend on the materials you choose. Wood is typically more expensive than laminate or metal. You can expect to spend anywhere from $50 to $200 for materials, depending on the size and complexity of your project.
How long does it take to build a chess table?
The time it takes to build a chess table will depend on your experience and the complexity of the design. A simple compact chess table can be built in a few hours, while a folding chess table with extra features may take several days.
Do I need woodworking experience to build a chess table?
While some woodworking experience is helpful, you don’t need to be a professional to build a chess table. There are plenty of simple designs that are perfect for beginners. Just make sure to follow the instructions carefully and be patient.
Building a compact chess table is a fun and rewarding project. It’s a great way to add a touch of elegance to your home and create a dedicated space for your favorite game.
Stylish and Functional Wine Racks to Sell Locally

Stylish and Functional Wine Racks to Sell Locally
Wine racks are an essential addition to any home with a discerning palate. They not only provide a practical solution for storing your beloved bottles but also add a touch of elegance and sophistication to your space. If you're looking to tap into this growing market, consider offering stylish and functional wine racks for sale in your local area. Here's a comprehensive guide to help you get started:
Market Research and Target Audience
Before diving into the design and production of wine racks, it's crucial to understand your target audience and the local market. This involves conducting thorough market research to identify:
Demographics and Preferences
- The average age, income, and lifestyle of your potential customers.
- Their preferred wine storage styles and aesthetics.
- The types of wines they collect (e.g., red, white, sparkling).
- The size of their wine collections and storage needs.
Competition Analysis
- Identify your competitors in the local area, both online and brick-and-mortar.
- Analyze their pricing strategies, product offerings, and marketing approaches.
- Determine your unique selling proposition (USP) and how you can differentiate yourself from the competition.
Local Market Trends
- Explore the popularity of different wine rack styles in your region.
- Consider any local events, festivals, or wine-related businesses that could potentially attract your target audience.
- Assess the overall demand for wine storage solutions in your area.
Design and Functionality
Wine racks should be both visually appealing and practical, offering efficient storage while complementing the existing decor of your customers' homes. Consider the following design factors:
Style and Aesthetics
- Modern and Minimalist: Sleek lines, clean designs, and minimalist materials like metal or acrylic.
- Rustic and Industrial: Reclaimed wood, metal accents, and distressed finishes.
- Contemporary: Bold geometric shapes, vibrant colors, and unique materials.
- Traditional: Classic wooden racks with intricate carvings or ornate details.
Size and Capacity
- Offer a range of sizes to accommodate different wine collections, from compact units for small spaces to larger racks for extensive cellars.
- Provide information on the capacity of each rack, including the number of bottles it can hold.
Bottle Storage Options
- Standard Racks: Traditional horizontal shelves for storing bottles on their sides.
- Vertical Racks: Space-saving designs that store bottles upright.
- Hanging Racks: Suspend bottles from the ceiling or wall for a unique display.
- Wall-Mounted Racks: Ideal for maximizing space in smaller kitchens or dining areas.
- Freestanding Racks: Versatile options that can be placed anywhere in the room.
Materials and Construction
- Wood: Provides warmth and elegance, with options ranging from oak and walnut to reclaimed barnwood.
- Metal: Offers durability and a modern aesthetic, available in various finishes like chrome, black, and stainless steel.
- Acrylic: Transparent material that allows bottles to be displayed prominently.
- Combinations: Explore unique and creative blends of materials for a distinctive look.
Production and Sourcing
Once you've finalized your wine rack designs, you'll need to decide on a production method and source the necessary materials. Consider the following factors:
Production Options
- DIY: If you have woodworking or metalworking skills, you can create wine racks yourself, allowing for greater customization and potential cost savings.
- Outsourcing: Partner with local manufacturers or artisans who specialize in wood or metal fabrication to produce your designs.
- Dropshipping: Work with a dropshipper who handles inventory and shipping, allowing you to focus on marketing and sales.
Material Sourcing
- Local Suppliers: Source wood, metal, or other materials from local businesses, supporting local businesses and reducing shipping costs.
- Online Retailers: Explore online platforms for a wider range of materials and options, ensuring competitive pricing and efficient delivery.
- Recycled Materials: Incorporate sustainable materials like reclaimed wood or repurposed metal to appeal to environmentally conscious consumers.
Marketing and Sales
To successfully sell your stylish and functional wine racks, you need a compelling marketing strategy to reach your target audience.
Online Presence
- Create a professional website with high-quality images of your products and detailed descriptions of each design.
- Utilize social media platforms like Instagram and Pinterest to showcase your wine racks and engage with potential customers.
- Run online advertising campaigns on platforms like Google Ads or Facebook Ads to reach a wider audience.
- Offer online ordering and secure payment options for a seamless shopping experience.
Offline Marketing
- Attend local events and festivals related to wine, home decor, or crafts.
- Partner with local businesses like wine shops, restaurants, or home decor stores for cross-promotion.
- Distribute flyers and brochures in high-traffic areas frequented by your target audience.
- Offer special discounts or promotions to incentivize purchases.
Customer Service
- Provide excellent customer service to build trust and loyalty.
- Offer personalized recommendations and assist customers in selecting the right wine rack for their needs.
- Address any concerns or complaints promptly and professionally.
- Encourage customer reviews and testimonials to build social proof.
Pricing and Profitability
Determining the right pricing strategy is essential for maximizing your profits and remaining competitive. Consider these factors:
Cost of Production
- Calculate the direct costs of materials, labor, and production overhead for each wine rack design.
- Factor in any additional expenses such as packaging, shipping, and marketing.
Market Analysis
- Research the pricing of similar wine racks in your local market.
- Analyze the perceived value of your designs and the features that differentiate your products.
Profit Margin
- Determine a realistic profit margin that covers your costs and allows for growth.
- Offer different pricing tiers based on size, complexity, and materials used.
Conclusion
Selling stylish and functional wine racks in your local area presents a lucrative opportunity to tap into the growing demand for home storage solutions and wine accessories. By conducting thorough market research, designing appealing and practical racks, establishing efficient production processes, and implementing effective marketing strategies, you can create a successful business that brings elegance and functionality to wine enthusiasts in your community.
Crafting Functional Bath Trays for Everyday Use

Crafting Functional Bath Trays for Everyday Use
Transforming a mundane bath into a luxurious spa experience is a pursuit many of us crave. Enter the bath tray, a simple yet elegant addition that elevates your bath routine to new heights. This versatile accessory not only adds a touch of sophistication to your bathroom décor but also provides a practical platform for indulging in your favorite bath-time activities.
The Benefits of Using a Bath Tray
Bath trays offer a range of benefits that contribute to a more enjoyable and relaxing bathing experience.
Convenience and Organization
Imagine the ease of having your essentials within arm's reachâ€"a book, a glass of wine, a soothing candle, or your favorite bath bomb. A bath tray keeps everything neatly organized, eliminating the need to constantly reach for items on the floor or the edge of the tub.
Enhanced Relaxation
By providing a stable surface for your bath-time indulgences, a tray creates an environment conducive to relaxation. You can finally enjoy a good book without the risk of dropping it in the water or savor your favorite beverage without worrying about spills.
Safety and Stability
A bath tray acts as a barrier between your bathwater and valuable items, preventing accidental drops and damage. Its sturdy design ensures the safety of your belongings, allowing you to fully immerse yourself in your bath without worry.
Choosing the Right Bath Tray
With a multitude of bath trays available on the market, selecting the right one for your needs can seem daunting. Consider these factors:
Material
- Bamboo: Lightweight, durable, and naturally water-resistant, bamboo trays offer a rustic charm and a sustainable choice.
- Wood: Solid wood trays, often crafted from teak or cedar, exude a classic elegance and are known for their durability. They may require regular oiling to maintain their finish.
- Plastic: Lightweight and budget-friendly, plastic trays are ideal for everyday use. However, they may not offer the same level of aesthetic appeal as other materials.
- Metal: Sleek and modern, metal trays, often made from stainless steel or aluminum, are durable and easy to clean. However, they can be prone to scratching and may get cold to the touch.
Size and Shape
Choose a tray that fits comfortably across your bathtub. Consider the width and depth of your tub and the amount of space you need for your belongings. Oval or rectangular trays are common shapes, while some offer unique designs to suit different bath sizes and preferences.
Features
- Built-in Cup Holders: Perfect for holding glasses of wine, tea, or water.
- Magazine or Book Holders: Keep your reading material secure and accessible.
- Candle Holders: Create a spa-like ambiance with flickering candles.
- Storage Compartments: Organize your bath products, toiletries, or other necessities.
- Slide-Out Trays: Convenient for retrieving items or placing them within reach.
Crafting Your Own Bath Tray
For those who enjoy DIY projects, crafting a bath tray offers a unique and personal touch. Here's a simple guide:
Materials
- Wood Board: Choose a sturdy, water-resistant wood like cedar, teak, or redwood.
- Waterproof Wood Glue: For securing the tray's components.
- Wood Stain or Paint: For customizing the tray's appearance.
- Clear Waterproof Finish: To protect the wood from water damage.
- Optional Extras: Cup holders, magazine holders, candle holders, or other desired features.
Steps
- Measure and Cut: Measure your bathtub and determine the desired size and shape of your tray. Cut the wood board accordingly, ensuring the edges are smooth and free of splinters.
- Add Optional Features: Attach cup holders, magazine holders, or other features to the tray using wood glue. Allow the glue to dry completely before proceeding.
- Sand and Finish: Smooth any rough edges or imperfections with sandpaper. Apply a coat of wood stain or paint to achieve your desired color and finish. Allow the stain or paint to dry completely before applying a clear waterproof finish.
- Add Extra Protection: For added durability and water resistance, apply several coats of clear waterproof finish, allowing each coat to dry completely before applying the next.
- Enjoy: Once the finish is completely dry, your handcrafted bath tray is ready to use! Enjoy the benefits of a personalized and functional bath tray designed to enhance your bathing experience.
Tips for Maintaining Your Bath Tray
To ensure the longevity of your bath tray and maintain its beauty, follow these simple tips:
Clean Regularly
Wipe down the tray after each use with a damp cloth. For more stubborn stains, use a mild soap and water solution. Avoid harsh chemicals or abrasive cleaners that can damage the surface.
Dry Thoroughly
After cleaning, dry the tray completely to prevent water damage and mildew growth. It's best to store the tray in a dry area when not in use.
Apply Protective Finish
For wood trays, periodically apply a fresh coat of clear waterproof finish to maintain its protective layer and prevent water damage.
Handle with Care
Avoid placing heavy objects on the tray or using it for other purposes that may damage its structure. Handle it with care to ensure its longevity.
In conclusion, a functional bath tray is a welcome addition to any bathroom, elevating your bathing experience from ordinary to extraordinary. Whether you choose to purchase one or embark on a DIY crafting adventure, investing in a bath tray is an investment in your well-being and relaxation.
How to Market and Sell Handmade Wood Signs

Crafting a Successful Business: Marketing and Selling Handmade Wood Signs
You've poured your heart and soul into crafting beautiful, unique wood signs. Now, the challenge lies in getting them into the hands of eager buyers. Marketing and selling handmade wood signs requires a blend of online and offline strategies, each playing a crucial role in building your brand and attracting customers.
Building a Strong Online Presence
The internet is your gateway to a global audience. A well-crafted online presence is essential for reaching potential buyers and establishing your brand.
1. Website and Social Media
Start by creating a user-friendly website that showcases your work. Use high-quality images to highlight the details and craftsmanship of each sign. Don't forget to include detailed descriptions, pricing, and contact information. Supplement your website with active social media accounts on platforms like Instagram, Facebook, and Pinterest, where you can share behind-the-scenes glimpses, new designs, and customer testimonials. Leverage visual storytelling to create a sense of connection and showcase your passion for woodworking.
2. Online Marketplaces
Expand your reach by listing your signs on online marketplaces dedicated to handcrafted goods, such as Etsy, Artfire, and Society6. These platforms connect you with a vast network of potential customers interested in unique and handmade items. Optimize your listings with compelling descriptions, relevant keywords, and high-resolution images to attract more attention.
Engaging with Customers
Build relationships with your customers through authentic communication and personalized experiences.
1. Personalized Communication
Respond promptly to inquiries, whether through your website, social media, or email. Provide detailed information about your products and offer personalized advice to help customers find the perfect sign. A friendly and helpful demeanor goes a long way in building customer trust and loyalty.
2. Custom Orders and Personalized Touches
Offer custom order options to cater to individual preferences and create truly unique pieces. Allow customers to personalize signs with their names, dates, or special messages. Such personalized touches make your signs more meaningful and memorable for customers.
Offline Marketing and Sales Strategies
While the online world offers vast opportunities, don't underestimate the power of traditional marketing and local outreach.
1. Local Craft Fairs and Markets
Participate in local craft fairs and markets to directly connect with potential customers. Engage with visitors, showcase your products, and collect valuable feedback. Consider offering exclusive discounts or promotions at these events to incentivize purchases.
2. Partner with Local Businesses
Collaborate with local businesses, such as coffee shops, bookstores, or boutiques, to display your signs in their spaces. This provides valuable exposure and allows customers to see your work in a real-world setting. Consider offering a percentage of sales to your partner as a way to incentivize the collaboration.
3. Word-of-Mouth Marketing
Don't underestimate the power of word-of-mouth marketing. Encourage satisfied customers to share their experiences with friends and family. Offer referral bonuses or discounts to incentivize referrals. Excellent customer service and high-quality products will naturally lead to positive word-of-mouth.
Pricing and Sales Strategies
Pricing your signs strategically and utilizing effective sales tactics can maximize your revenue.
1. Pricing Strategies
Consider the cost of materials, labor, and time invested in creating each sign when setting prices. Research competitive pricing for similar products and determine a fair price that reflects the value of your craftsmanship. Experiment with pricing models, such as tiered pricing based on size or complexity, to cater to different customer budgets.
2. Sales and Promotions
Offer limited-time sales, discounts, or bundles to attract customers and incentivize purchases. Consider offering free shipping for orders above a certain amount or offering special discounts for holidays or seasonal events. Experiment with different sales tactics to see what resonates best with your target audience.
Continuously Improve and Adapt
The world of handcrafted goods is constantly evolving. Stay ahead of the curve by continuously improving your skills, experimenting with new designs, and adapting your marketing strategies to meet changing consumer preferences. Seek feedback from customers and industry experts to identify areas for improvement and refine your approach. Embrace the challenges and opportunities that come with running a handmade wood sign business, and you'll build a thriving enterprise that resonates with your passion and creativity.
Wooden Lawn Chairs That Are Perfect for Relaxing by the Pool or Beach
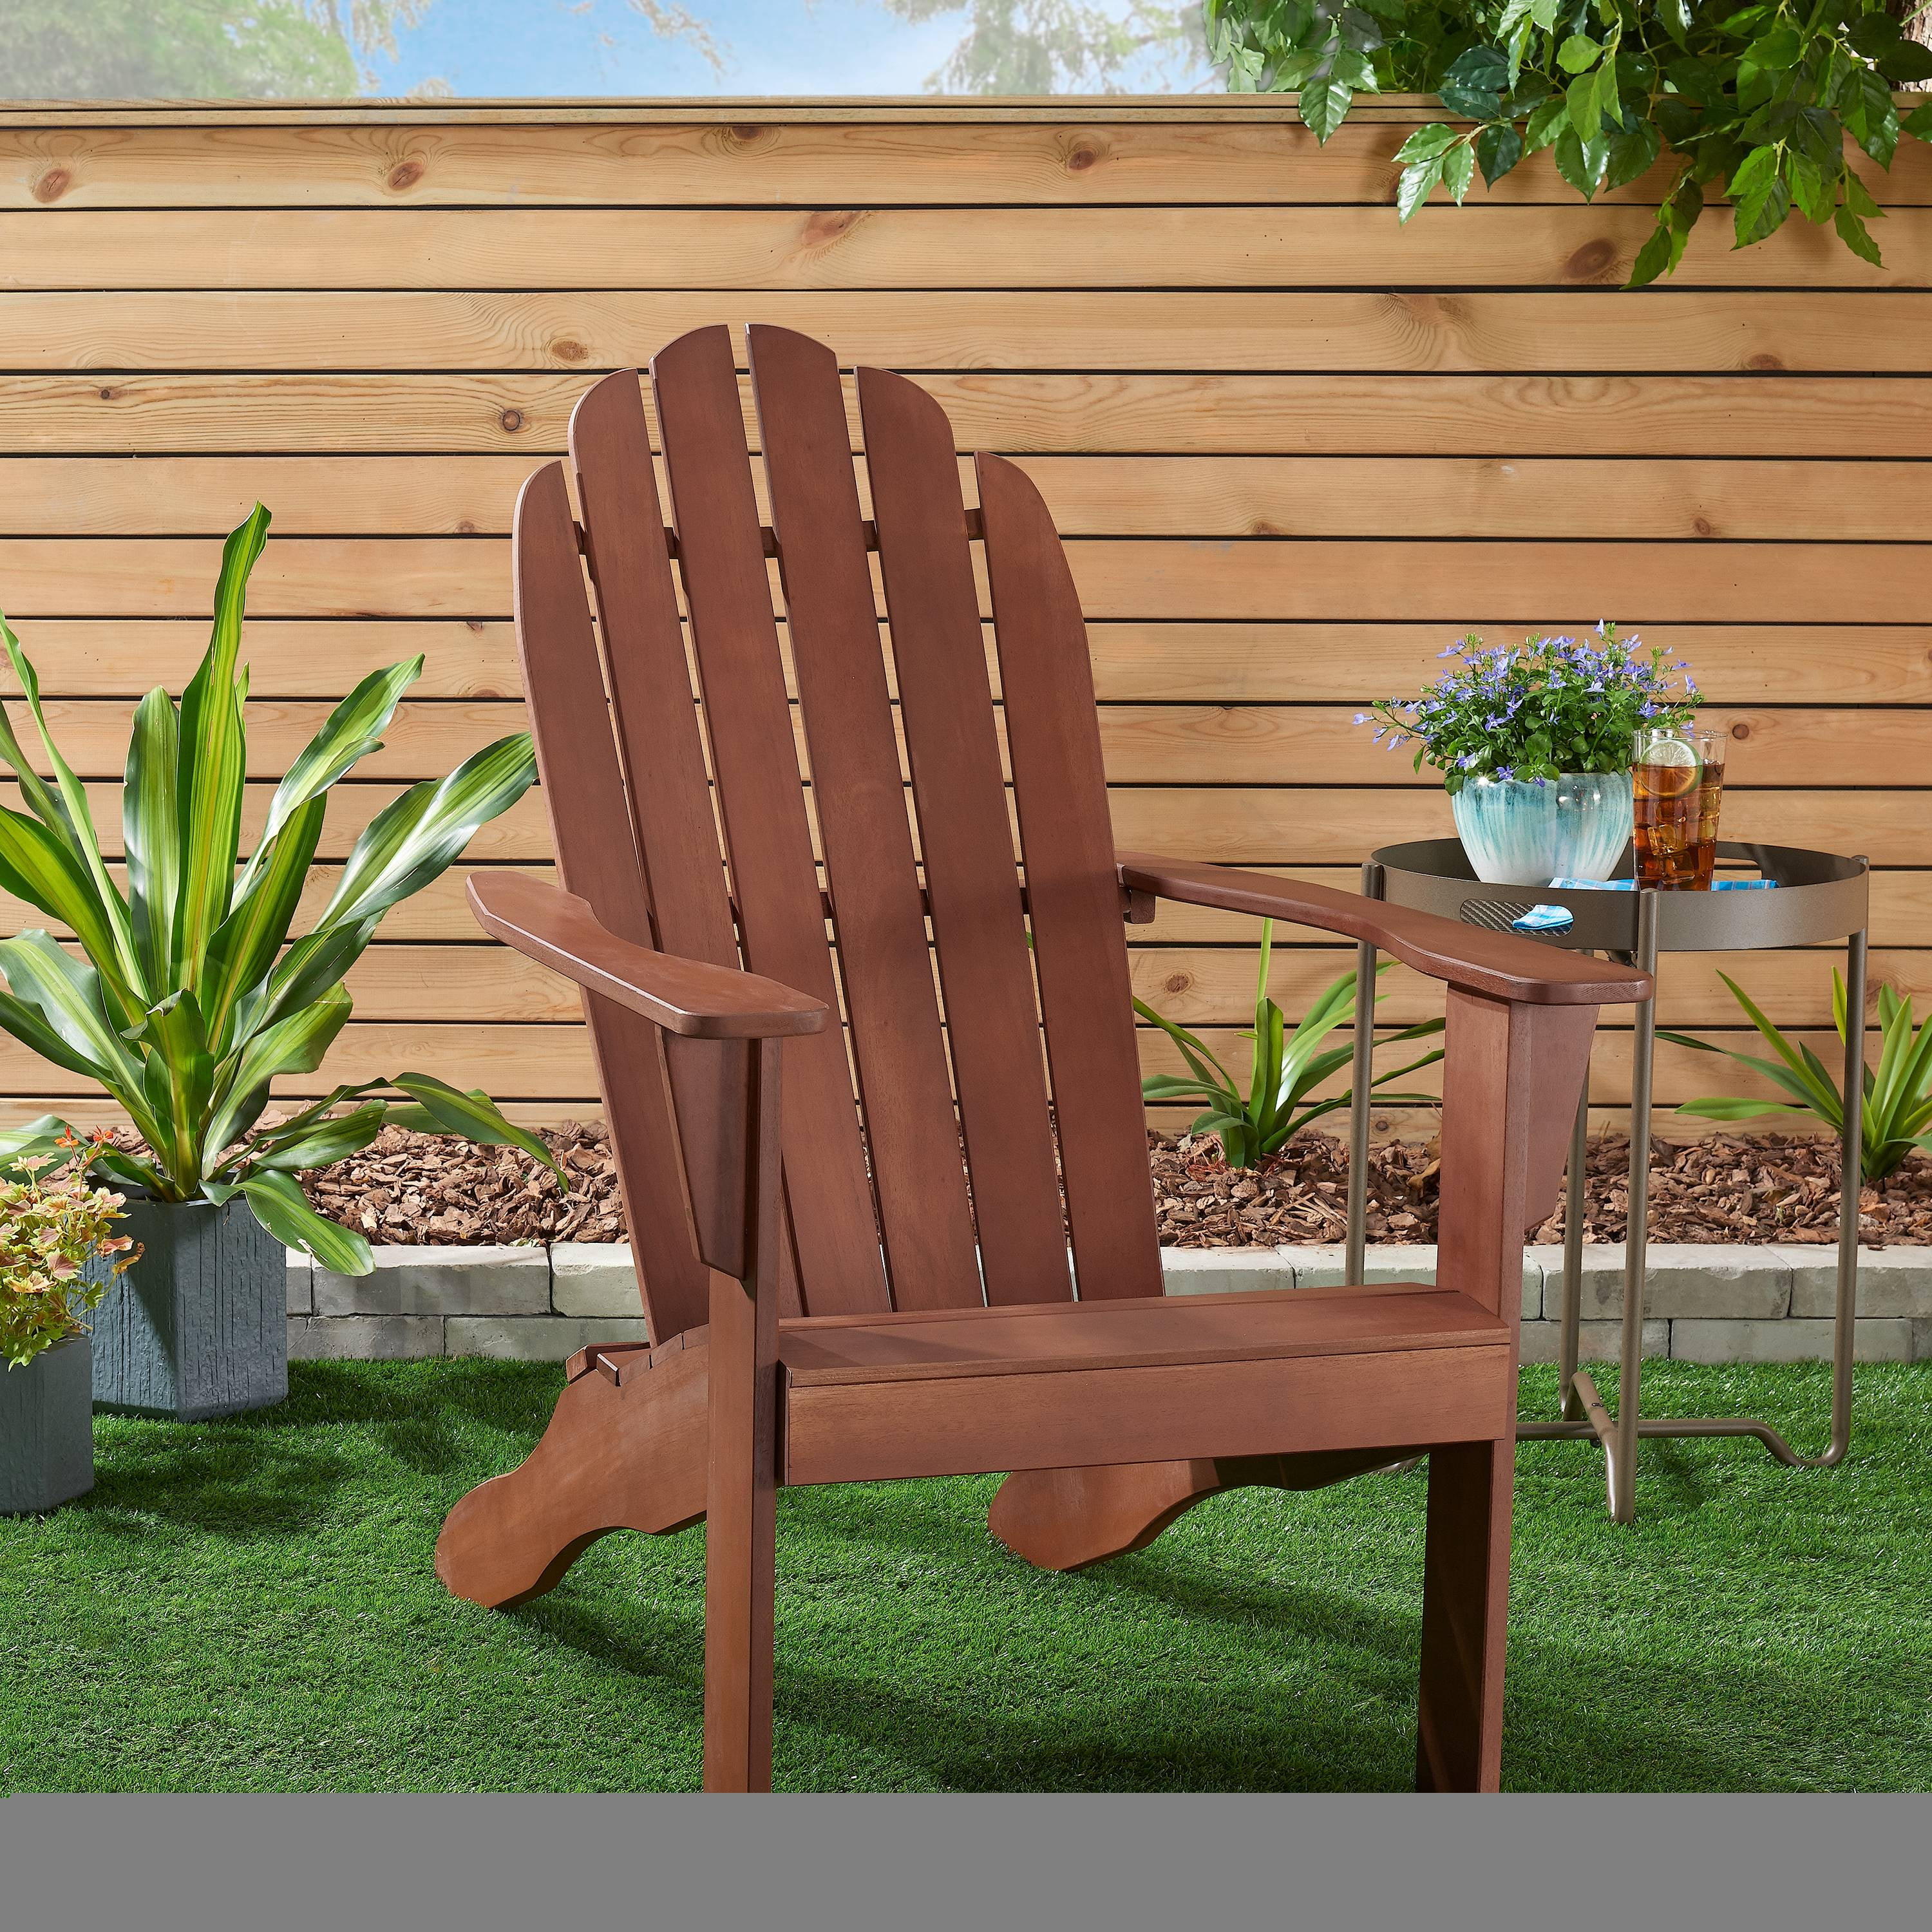
Wooden Lawn Chairs: The Perfect Seat for Poolside and Beachside Relaxation
In the realm of outdoor furniture, wooden lawn chairs stand as timeless classics, embodying a blend of durability, comfort, and aesthetic appeal. These chairs, crafted from nature's finest materials, have long been favored for their ability to create an atmosphere of tranquility and relaxation. Whether you seek a comfortable spot by the pool, a cozy nook on the beach, or a charming addition to your garden, wooden lawn chairs offer an unparalleled experience.
The Allure of Wood
The choice of wood for lawn chairs is not merely a matter of tradition; it stems from the material's inherent qualities that make it ideal for outdoor use. Wood is naturally resilient and weather-resistant, capable of withstanding the elements for years to come. Its inherent strength ensures that the chair can support your weight comfortably, while its flexibility allows for a slight give that conforms to your body. Moreover, wood's natural beauty adds a touch of warmth and elegance to any outdoor space.
The Art of Craftsmanship
The craftsmanship of wooden lawn chairs is a testament to the skill and artistry of furniture makers. From the selection of timber to the meticulous finishing touches, each chair is a labor of love. The wood is carefully chosen for its grain patterns, color variations, and strength. The chair's frame is then meticulously assembled, using traditional joinery techniques that ensure its durability. The final step often involves a protective finish, such as oil or varnish, that enhances the wood's natural beauty and protects it from the elements.
Types of Wooden Lawn Chairs
The world of wooden lawn chairs offers a wide range of styles, each designed to cater to different tastes and preferences. From classic Adirondack chairs to sleek modern designs, there is a wooden lawn chair for every outdoor oasis.
The Adirondack Chair
The Adirondack chair, with its iconic sloping backrest and wide armrests, is a true symbol of outdoor relaxation. This chair was originally designed in the early 20th century for use at a summer cottage in the Adirondack Mountains of New York. Its simple yet elegant design has made it a timeless classic. The Adirondack chair is typically crafted from cedar or redwood, both of which are known for their durability and natural resistance to rot.
The Folding Chair
Folding wooden lawn chairs offer the perfect blend of comfort and convenience. These chairs can be easily stored away when not in use, making them ideal for smaller spaces or for those who prefer to keep their outdoor furniture tidy. Folding chairs come in a variety of designs, from simple and practical to more elaborate and stylish. They are often made from teak or mahogany, both of which are known for their rich color and durability.
The Sling Chair
Sling wooden lawn chairs combine the comfort of a hammock with the support of a traditional chair. These chairs feature a suspended seat and backrest made of woven fabric, typically canvas or nylon. The sling design provides exceptional comfort and breathability, making it perfect for warm weather. Sling chairs are typically made from a combination of wood and metal, with the frame often crafted from teak, mahogany, or eucalyptus.
Choosing the Right Wooden Lawn Chair
Selecting the perfect wooden lawn chair for your needs requires careful consideration of several factors. These factors include the chair's size, comfort level, durability, and aesthetic appeal.
Size and Comfort
The size of the chair is crucial for ensuring comfort and proper support. A larger chair will offer more room for lounging and relaxation, while a smaller chair may be more suitable for those with limited space. The chair's backrest and armrests should provide adequate support, and the seat should be wide and deep enough to ensure a comfortable sitting experience.
Durability and Weather Resistance
Durability and weather resistance are essential considerations for outdoor furniture. Look for chairs made from high-quality wood, such as cedar, redwood, teak, mahogany, or eucalyptus. These woods are naturally resistant to rot, decay, and insect infestation. Additionally, consider the chair's construction, ensuring that it is securely assembled with durable joints.
Aesthetic Appeal
The aesthetic appeal of a wooden lawn chair is a matter of personal preference. Choose a chair that complements your outdoor space and reflects your personal style. Some popular styles include classic Adirondack chairs, modern minimalist designs, and rustic farmhouse chairs. Consider the chair's color, finish, and overall design to ensure that it harmonizes with your surroundings.
Caring for Your Wooden Lawn Chairs
To ensure that your wooden lawn chairs remain beautiful and functional for years to come, proper care and maintenance are essential. Here are some tips for keeping your chairs in top condition:
- Clean regularly: Sweep or brush away dirt and debris from the chair's surface on a regular basis.
- Protect from the elements: Cover your chairs during periods of heavy rain or snow to prevent water damage.
- Treat with oil or varnish: Apply a protective oil or varnish to the wood on a regular basis to prevent weathering and to enhance the wood's natural beauty.
- Store properly: If you are not using your chairs for extended periods, store them in a dry and sheltered location.
Conclusion
Wooden lawn chairs are more than just furniture; they are an invitation to slow down, relax, and enjoy the simple pleasures of life. These chairs offer a blend of durability, comfort, and aesthetic appeal, making them the perfect companions for poolside lounging, beachside relaxation, or simply unwinding in your backyard. Whether you choose a classic Adirondack chair, a sleek modern design, or a cozy sling chair, a wooden lawn chair is sure to create a welcoming and inviting ambiance for your outdoor space. With proper care and maintenance, your wooden lawn chairs will continue to provide years of enjoyment and relaxation for you and your loved ones.
Profitable Woodworking Ideas for Beginners

Profitable Woodworking Ideas for Beginners: Turning Your Passion into Profit
Hey there, fellow woodworkers! Are you itching to turn your love for crafting with wood into a lucrative side hustle or even a full-time gig? You're not alone! Woodworking is a fantastic way to combine creativity, skill, and practicality. But where do you start?Finding Your Niche: What Kind of Woodworking Are You Passionate About?
The first step is to figure out what kind of woodworking gets your heart racing. Are you drawn to the clean lines and functionality of furniture? Maybe you're fascinated by the intricate details of decorative pieces like boxes, toys, or ornaments. Perhaps you're a fan of rustic, farmhouse-style projects. Whatever your passion is, it's the key to finding your niche in the woodworking market.Here are some popular woodworking niches to consider:
- Furniture Building: Tables, chairs, benches, desks, and cabinets are always in demand, especially with a focus on custom designs and reclaimed materials.
- Home Decor: Think unique shelves, wall art, mirrors, picture frames, and decorative boxes. This niche is great for playing with different styles and experimenting with various wood types.
- Outdoor Furniture: Patio sets, garden benches, planters, and birdhouses are perfect for warmer months and cater to outdoor enthusiasts.
- Personalized Gifts: Engraved cutting boards, customized signs, wooden toys, and jewelry boxes are thoughtful and marketable gifts that stand out.
- Restoration and Upcycling: Giving old furniture a new lease on life is environmentally conscious and appealing to those who appreciate vintage charm.
Starting Small: Simple Projects to Gain Experience and Build Your Portfolio
Before diving into complex projects, it's wise to start with something manageable. Simple projects are great for honing your skills, getting comfortable with your tools, and gaining confidence. They also offer a chance to experiment with different wood types, finishes, and techniques without investing too much time or money.Here are a few beginner-friendly woodworking projects you can tackle:
- Cutting boards: They're relatively easy to make, offer opportunities for experimentation with wood types, and make practical gifts.
- Small boxes: You can practice joining techniques and explore decorative elements like inlays or carving.
- Birdhouses: They're perfect for learning about basic carpentry and adding a touch of whimsy to your woodworking portfolio.
- Picture frames: A great way to practice precise cuts and explore various finishing options.
- Coasters: A fun way to experiment with different wood types, stains, and shapes.
Essential Tools for Woodworking Success: Don't Skimp on Quality!
Investing in good-quality tools is crucial for woodworking. While you can start with a few essential tools, be prepared to expand your collection as your skills and projects evolve.Here's a basic list of woodworking tools you'll need:
- Hand saw: A must-have for basic cutting. Choose a saw with sharp teeth and a comfortable grip.
- Circular saw: For straight cuts, ripping wood, and cutting large pieces.
- Jig saw: Ideal for intricate cuts and curves.
- Power drill: For drilling holes and driving screws.
- Clamps: Essential for holding pieces together during assembly and woodworking.
- Sandpaper: For smoothing surfaces and creating a polished finish.
- Wood glue: For joining wood pieces securely.
- Safety glasses: Protecting your eyes is non-negotiable.
- Ear protection: Noise from power tools can damage your hearing.
- Measuring tape: Accurate measurements are vital for precise woodworking.
Marketing Your Woodworking Creations: Finding the Right Customers
Now that you've created some awesome woodworking pieces, it's time to get them in front of potential buyers. Here are some effective ways to market your creations:Online Marketplaces:
- Etsy: This popular platform is perfect for selling handmade goods, including woodworking pieces. It offers a built-in audience and promotes your creations to a wider audience.
- Amazon Handmade: Similar to Etsy, but with the added advantage of Amazon's vast customer base and fulfillment services.
- Facebook Marketplace: A great option for reaching local buyers who are looking for unique handmade goods.
Social Media:
- Instagram: Showcase your woodworking skills with stunning photos and videos of your creations. Use relevant hashtags to reach a wider audience.
- Pinterest: Create visually appealing pins that highlight your projects and inspire potential customers.
- Facebook: Create a business page to connect with customers and showcase your work.
Local Markets and Events:
- Craft fairs and farmers markets: These events provide a platform for selling directly to customers and establishing a local presence.
- Community events and festivals: Participate in events that attract a target audience for your woodworking creations.
Pricing Your Woodworking Products: Finding the Sweet Spot
Pricing your woodworking products can be tricky. You need to cover your material costs, your time, and make a profit. It's also essential to consider your target market and what they are willing to pay for handmade goods.Here are some factors to consider when pricing your woodworking:
- Material costs: Factor in the price of wood, finishing materials, hardware, and any other supplies.
- Your time and effort: Calculate your hourly rate and consider the time you spend on each project, from design to finishing.
- Market research: Look at the prices of similar products from other woodworkers and craft vendors.
- Your profit margin: Decide on a desired profit margin that reflects the value of your craft and your time invested.
Building Your Woodworking Business: From Hobby to Hustle
Once you have a solid foundation in woodworking, you can start turning your hobby into a thriving business. Here are some tips to help you build your woodworking business:Develop a Business Plan:
- Outline your business goals, target market, marketing strategy, pricing, and financial projections.
- A solid business plan helps you stay focused, track your progress, and make informed decisions.
Invest in Quality Equipment and Tools:
- As your woodworking business grows, you'll need to invest in more powerful tools to handle larger projects and increase your efficiency.
- Consider investing in a dust collector to improve your workshop environment and ensure a healthy workspace.
Provide Excellent Customer Service:
- Build relationships with customers by responding promptly to inquiries, providing detailed information about your products, and offering personalized solutions.
- Happy customers are your best advocates and will help spread the word about your woodworking business.
Seek Feedback and Continuously Improve:
- Ask customers for feedback on their experiences with your products and services.
- Embrace constructive criticism and use it as an opportunity to refine your skills and improve your offerings.
Woodworking is a rewarding journey. Enjoy the process, learn from your mistakes, and never stop experimenting. By combining your passion with dedication, you can create beautiful and functional pieces that bring joy to others, and perhaps even turn your hobby into a profitable business!
Make Money with These Easy-to-Sell Woodworking Ideas

Money-Making Woodworking Ideas: Easy to Sell and in High Demand
Woodworking offers a rewarding way to turn your skills into a profitable venture. With the increasing popularity of handcrafted goods, there's a thriving market for unique and high-quality wooden items. Whether you're a seasoned woodworker or just starting out, this article explores several easy-to-sell woodworking ideas that are sure to attract customers.
Home Decor and Furnishings
Home decor items are consistently in demand, making them an ideal starting point for woodworking businesses. The beauty of wood lies in its versatility, allowing for a wide array of decorative pieces that can elevate any space.
Wooden Signs
Personalized wooden signs are a popular choice for adding a touch of character to homes, businesses, and events. From welcome signs to inspirational quotes, the possibilities are endless. You can create various styles, using different fonts, wood types, and finishes to appeal to diverse tastes.
Wall Shelves
Functional and stylish, wall shelves offer a practical solution for organizing and showcasing belongings. Experiment with different shapes, sizes, and wood finishes to cater to various interior design styles. Consider incorporating unique features like metal brackets or rustic reclaimed wood for added appeal.
Coffee Tables
Coffee tables are essential furniture pieces that add a focal point to living rooms. Craft sturdy and aesthetically pleasing coffee tables using various wood types and designs. You can offer customization options like different sizes, shapes, and finishes to meet individual preferences.
Wooden Coasters
These small but essential items protect furniture surfaces from heat and spills. Create sets of coasters using different wood types and patterns, incorporating intricate designs or personalized engravings for a unique touch.
Kitchen and Dining Essentials
The kitchen and dining space offer a wealth of woodworking opportunities, as people constantly seek functional and stylish additions to these areas.
Cutting Boards
Cutting boards are indispensable in every kitchen. Offer a variety of sizes and shapes, using different wood types known for their durability and moisture resistance. Consider adding decorative elements like handles or engraved designs to enhance their appeal.
Serving Trays
Serve trays elevate the dining experience, adding a touch of elegance to meals and gatherings. Craft trays using various wood types and finishes, incorporating handles or decorative inlays for a sophisticated look.
Wine Racks
For wine enthusiasts, a well-crafted wine rack is a cherished addition to any home. Design wine racks using various wood types and styles, offering different sizes and capacities to accommodate diverse wine collections.
Outdoor Living and Garden Decor
The outdoors offers a unique canvas for woodworking, allowing you to create pieces that enhance outdoor spaces and blend seamlessly with nature.
Planters
Wooden planters add a touch of rustic charm to gardens and patios. Offer various sizes, shapes, and styles, using different wood types and finishes. Consider adding decorative elements like engraved details or metal accents.
Birdhouses
Birdhouses attract feathered friends to gardens, adding a lively touch to outdoor spaces. Craft birdhouses using different wood types and designs, incorporating decorative elements like shingles or intricate carvings.
Outdoor Furniture
Wooden furniture is a popular choice for outdoor living spaces, offering durability and natural beauty. Create benches, chairs, tables, and swings using weather-resistant wood types and finishes. Consider incorporating decorative elements like woven straps or metal accents.
Personalized and Custom-Made Items
The ability to personalize and customize items sets woodworking apart, allowing you to cater to individual needs and preferences. This personalized touch can significantly enhance the value and appeal of your creations.
Engraved Gifts
Personalized engraved items are a thoughtful and unique gift for any occasion. Offer a variety of items like wooden boxes, photo frames, and jewelry boxes, with customized engravings that make them truly special.
Custom-Made Toys
Handcrafted wooden toys are sought after for their durability, safety, and classic charm. Offer a range of toys, from simple blocks and puzzles to intricate dolls and vehicles, catering to various age groups.
Personalized Wall Art
Custom-made wall art allows you to create unique and personalized pieces for homes and businesses. Offer a variety of options like decorative wood panels, framed artwork, and three-dimensional sculptures, with customization options for size, shape, and design.
Tips for Success in Selling Woodworking Items
To maximize your chances of success in selling woodworking items, consider these valuable tips:
- High-Quality Materials: Invest in high-quality wood and finishes to ensure durability, longevity, and a premium look.
- Unique Designs: Develop unique and appealing designs that stand out from the competition and cater to specific tastes.
- Professional Presentation: Package your items professionally, using appropriate packaging materials and branding elements.
- Online Presence: Establish an online presence through an e-commerce website or platforms like Etsy, allowing customers to browse and purchase your items conveniently.
- Social Media Marketing: Utilize social media platforms to showcase your work, engage with potential customers, and promote special offers.
- Local Markets and Craft Shows: Participate in local markets and craft shows to connect with potential customers in person and demonstrate your skills.
- Customer Service: Provide excellent customer service, responding promptly to inquiries, addressing concerns, and offering after-sales support.
By incorporating these tips and consistently creating high-quality, unique, and appealing items, you can establish a successful woodworking business that brings both personal satisfaction and financial rewards.
Thursday, November 14, 2024
How to Create Elegant Edge-Grain Cutting Boards
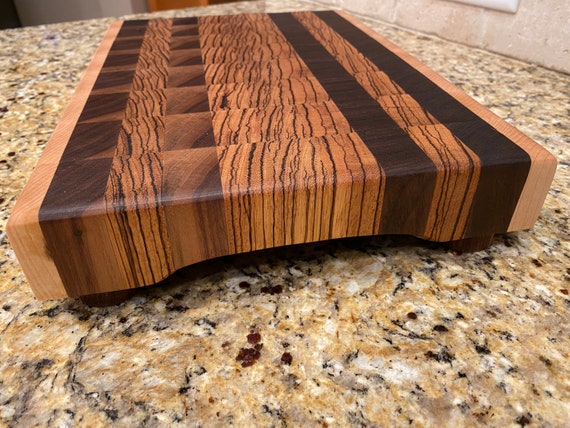
Crafting Elegant Edge-Grain Cutting Boards: A Guide to Exquisite Kitchen Essentials
In the realm of kitchen artistry, the cutting board stands as a silent sentinel, a testament to both functionality and aesthetics. Among the myriad styles, edge-grain cutting boards reign supreme, captivating with their enduring beauty and exceptional performance. This guide will equip you with the knowledge and techniques to craft your own exquisite edge-grain cutting boards, transforming your kitchen into a haven of culinary elegance.
Understanding the Advantages of Edge-Grain Construction
Edge-grain cutting boards, as their name suggests, are constructed with wood grain running perpendicular to the board's surface. This orientation provides unparalleled advantages, making them a prized possession for any discerning cook.
Exceptional Durability
The edge-grain construction imparts exceptional durability, making these boards resistant to knife cuts and scratches. The wood fibers run in a continuous direction, creating a robust surface that can withstand the rigors of daily culinary adventures.
Enhanced Stability
Edge-grain boards boast remarkable stability. The grain orientation minimizes warping and cracking, ensuring that your board remains flat and level over time, even with repeated exposure to moisture.
Elegant Appearance
The stunning grain patterns revealed in edge-grain boards add a touch of sophistication to any kitchen. The interplay of light and shadow on the wood's natural textures creates a visual masterpiece, transforming a simple kitchen tool into a work of art.
Choosing the Right Wood
The selection of wood is paramount in crafting an exceptional cutting board. Opt for hardwoods known for their durability, hardness, and aesthetic appeal. Here are some popular choices:
- Maple: A timeless classic, maple offers excellent hardness and a beautiful, tight grain pattern.
- Cherry: Cherry wood boasts a warm reddish hue and a captivating grain pattern that deepens over time.
- Walnut: Known for its rich dark color and stunning swirling grain, walnut adds a touch of sophistication to any cutting board.
- Hardwood Bamboo: Bamboo, while technically a grass, is incredibly durable and offers a unique, sustainable option for cutting boards.
Preparing the Wood
Before embarking on the construction process, prepare your chosen wood by milling it to the desired thickness. Aim for a thickness of 1.5 to 2 inches for exceptional durability and stability. Ensure the wood is dry and free of knots, cracks, or other imperfections that could compromise the board's integrity.
Assembling the Cutting Board
Edge-grain cutting boards are typically constructed by laminating individual strips of wood together. This process creates a strong, stable core, showcasing the beauty of the wood grain.
Gluing the Strips
Use a high-quality woodworking glue designed for laminations. Apply a thin, even coat to the edges of each strip, ensuring a tight bond. Clamp the strips together securely, using evenly distributed pressure to create a uniform surface.
Planing and Sanding
Once the glue has dried, plane the board to its final thickness and shape. Smooth the surface with increasingly fine-grit sandpaper, achieving a silky-smooth finish that enhances both aesthetics and functionality.
Finishing Touches
To protect your cutting board from moisture and staining, apply a food-safe finish. Popular choices include mineral oil, butcher block oil, or food-grade epoxy resin. Follow the manufacturer's instructions carefully, ensuring that the finish is applied evenly and thoroughly.
Adding Personal Touches
Enhance the elegance of your cutting board by adding personal touches. Carve your initials, a decorative design, or a cherished quote into the surface. These personalized touches will transform your cutting board into a treasured heirloom.
Maintaining Your Edge-Grain Cutting Board
To ensure the longevity and beauty of your hand-crafted cutting board, follow these simple maintenance tips:
- Hand-wash only: Avoid soaking your cutting board in water, as this can lead to warping and damage.
- Dry thoroughly: After each use, dry your cutting board completely to prevent moisture buildup.
- Regularly oil: Apply a thin layer of food-safe oil to the surface every few weeks to maintain its moisture content and protect it from damage.
- Avoid abrasive cleaners: Use a mild soap and water to clean your cutting board. Avoid harsh chemicals or abrasive cleaners that can damage the surface.
With careful planning, meticulous execution, and a touch of creative flair, crafting an elegant edge-grain cutting board becomes an enriching endeavor. The result will be a beautiful and functional kitchen essential that will grace your culinary journey for years to come.
Profitable Bird Feeder Projects to Make and Sell
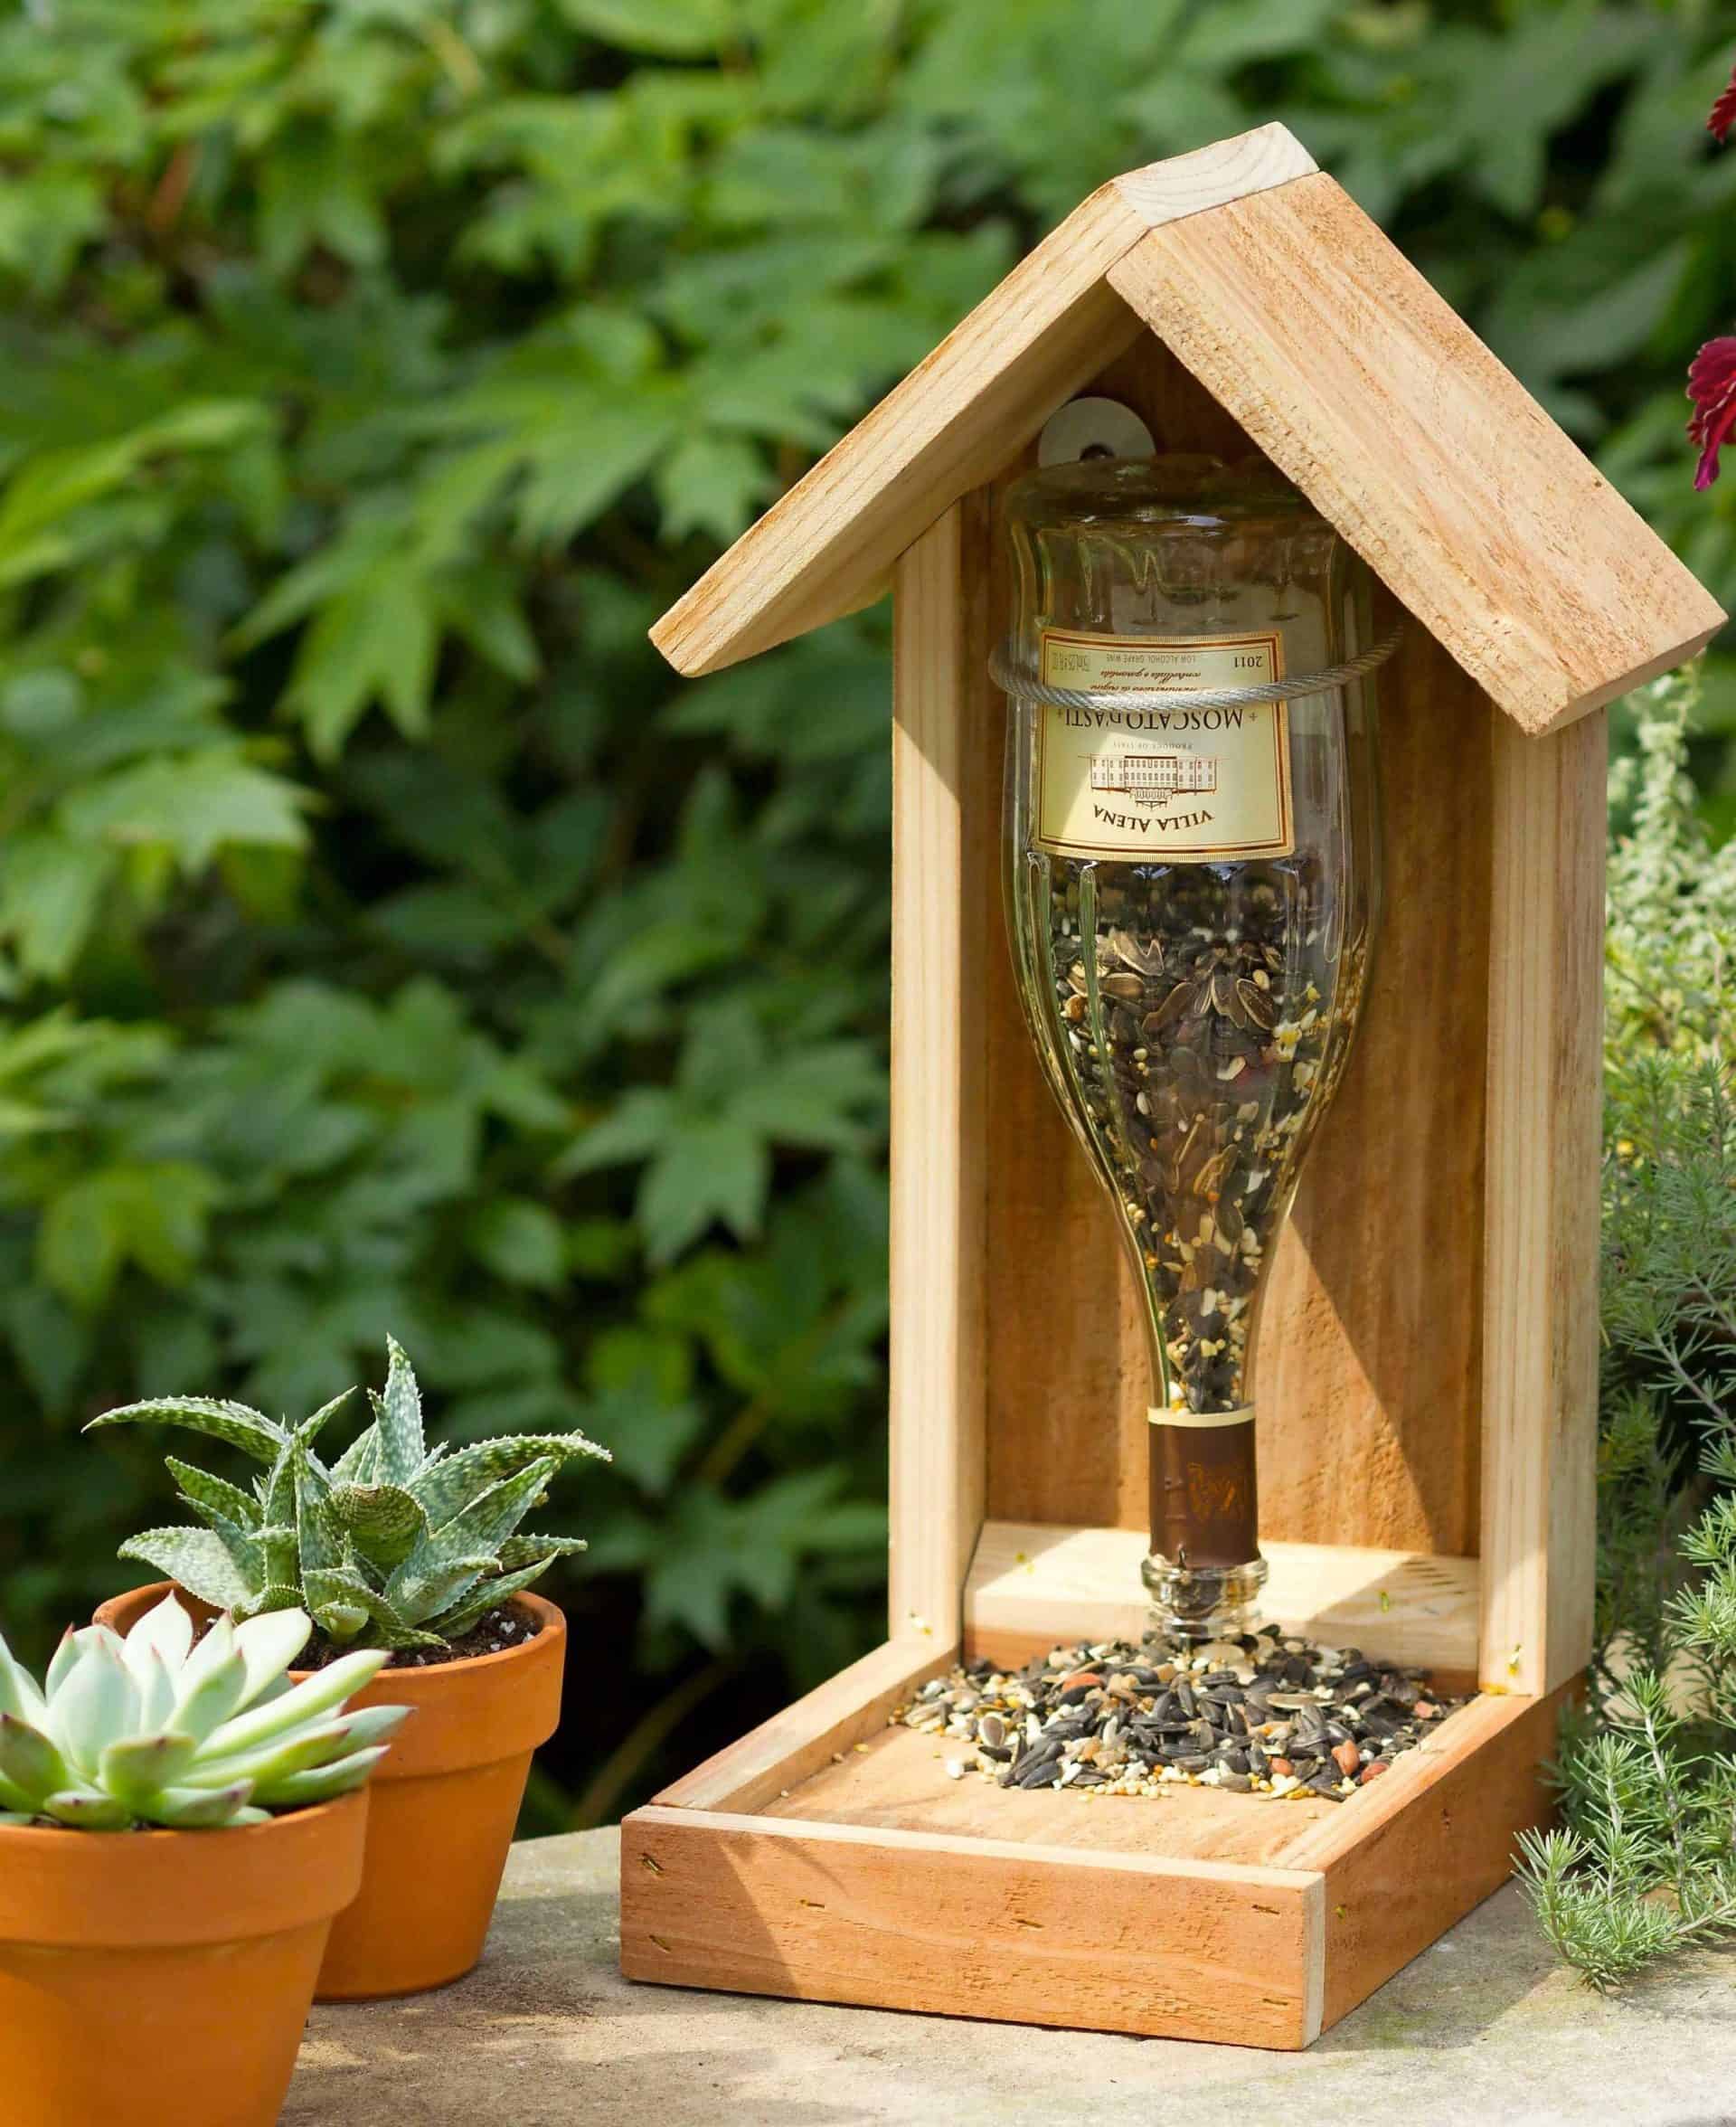
Profitable Bird Feeder Projects to Make and Sell
So you're thinking about starting a side hustle, and you're drawn to the idea of creating beautiful, functional bird feeders? You're in luck! There's a growing market for handcrafted bird feeders, and with a little creativity and effort, you can turn your passion into a profitable endeavor.
Let's dive into some ideas for bird feeder projects that are not only enjoyable to make but also have the potential to attract customers and keep your pockets lined.
Classic Designs with a Twist
Sometimes, the best ideas are the simplest. Start with the classic bird feeder designs and add your own personal touch. This is a great way to build your skills and experiment with different materials and techniques.
Upcycled Bird Feeders
Give old items a new life by turning them into bird feeders! Think repurposed teacups, vintage tin cans, or even old wooden crates. This approach appeals to eco-conscious customers and can be a fantastic way to create unique designs. Here's how to make a bird feeder out of a teacup:
- Clean your teacup thoroughly, removing any residue.
- Drill a small hole in the bottom of the teacup for drainage.
- Glue a small piece of sturdy wire or a metal ring to the lip of the teacup, providing a perch for the birds.
- Secure a wire hanger or loop for hanging from the top of the teacup.
- Fill the teacup with birdseed and enjoy your creation!
Modern Minimalist Bird Feeders
Simplicity is key! Design sleek and modern bird feeders using wood, metal, or even acrylic. You can go for clean lines and geometric shapes, focusing on functionality and a minimalist aesthetic. This approach can appeal to those who prefer a contemporary look in their backyard.
Personalized Bird Feeders
Let your customers personalize their feeders! Offer a variety of options for customization, such as different colors, finishes, or engraved details. This allows you to cater to individual tastes and create truly unique pieces.
Creative and Unique Bird Feeders
Now let's get creative! Think outside the box and explore some less conventional but equally delightful bird feeder designs.
Hummingbird Feeders
Hummingbirds are captivating creatures, and their dedicated feeders can be a real showstopper. Experiment with different bottle shapes, colors, and even add decorative elements to attract these tiny flying jewels. Make sure to use sugar water solutions that are safe and attractive to hummingbirds.
Ornamental Bird Feeders
Treat your bird feeders like miniature works of art! Incorporate intricate carvings, colorful mosaics, or whimsical shapes that blend seamlessly with a garden's aesthetic. Imagine a feeder shaped like a miniature house, a whimsical gnome, or a delicate flower. This approach goes beyond mere functionality and creates eye-catching garden accents.
DIY Bird Bath Feeders
Combine the elements of a bird bath and a feeder! This clever design can be very attractive. Use a shallow dish or a bowl, and place it on a platform. Then, fill it with water and add a small platform for the birds to perch on. The birds can enjoy a refreshing drink and a tasty snack at the same time.
The Business Side of Bird Feeders
Now that you're overflowing with creative bird feeder ideas, let's shift gears and talk about turning your passion into a thriving business.
Finding Your Target Market
Who are your ideal customers? Are you targeting bird enthusiasts, nature lovers, or those seeking unique home decor items? Identify your niche to ensure your marketing efforts are focused and effective.
Pricing Your Products
Consider your material costs, labor time, and desired profit margin. Research similar products online or in local craft stores to get an idea of competitive pricing. Remember, you want to be profitable but also appealing to your customers.
Marketing and Sales Strategies
Get creative with your marketing! Here are some ideas:
- Online Marketplaces: Etsy, Amazon Handmade, or your own website.
- Local Craft Fairs and Markets: These events provide direct interaction with customers.
- Social Media: Showcase your beautiful feeders on platforms like Instagram and Facebook.
- Partnerships: Collaborate with local nurseries, garden centers, or wildlife organizations.
Tips for Success
Here are some final tips to ensure your bird feeder business thrives:
- Focus on Quality: Use durable materials and pay attention to detail. Customers will appreciate the craftsmanship and longevity of your feeders.
- Provide Excellent Customer Service: Respond to inquiries promptly and offer helpful advice.
- Be Consistent: Regularly create new designs and keep your online presence updated with fresh content.
- Get Feedback: Listen to your customers and ask for feedback. Their insights can help you improve and adapt your products and services.
Starting a bird feeder business can be a rewarding journey. Combine your creativity, passion, and a touch of entrepreneurial spirit, and you'll be well on your way to building a successful and fulfilling business.